How do you make your own throwing target at home? Complete DIY guide 2025
Creating your target Manufacture and launch revolutionise your practice! This ultra-detailed guide reveals all the secrets to building an axe target at home. launch DIY professional, secure and personalised. Turn your garden into a real training ground with these techniques tried and tested by the experts.
Why make your own throwing target?
How do you make your own throwing target at home? Complete DIY guide 2025 2
Advantages of home-made versus commercial purchases
Building an axe target offers considerable advantages over commercial solutions:
Economic benefits :
Reduced cost : 60-80 % economics vs professional target
Optimised performance precise calibration according to use
Personal satisfaction :
Creative pride personal fulfilment
Technical training new skills
Family project collaborative activity
Equipment connection a special relationship
Home safety regulations
Before making a target out of woodCheck for legal compliance:
Belgian regulations :
Domestic use authorised on private property
Distances from safety: minimum 10 m from neighbouring dwellings
Home insurance Checking coverage of activities
Civil liability third-party accident protection
Safety standards :
Open area 20 m x 10 m minimum
Rear protection compulsory wall/retrieval net
Signage marking of the throwing area
Secure storage Storage of out-of-access axes
For a safe introduction, start by discovering <a href="/en/%c2%a0%c2%bb/activities/axe-throwing/%c2%a0%c2%bb/">axe throwing at a professional centre</a> before you start manufacturing.
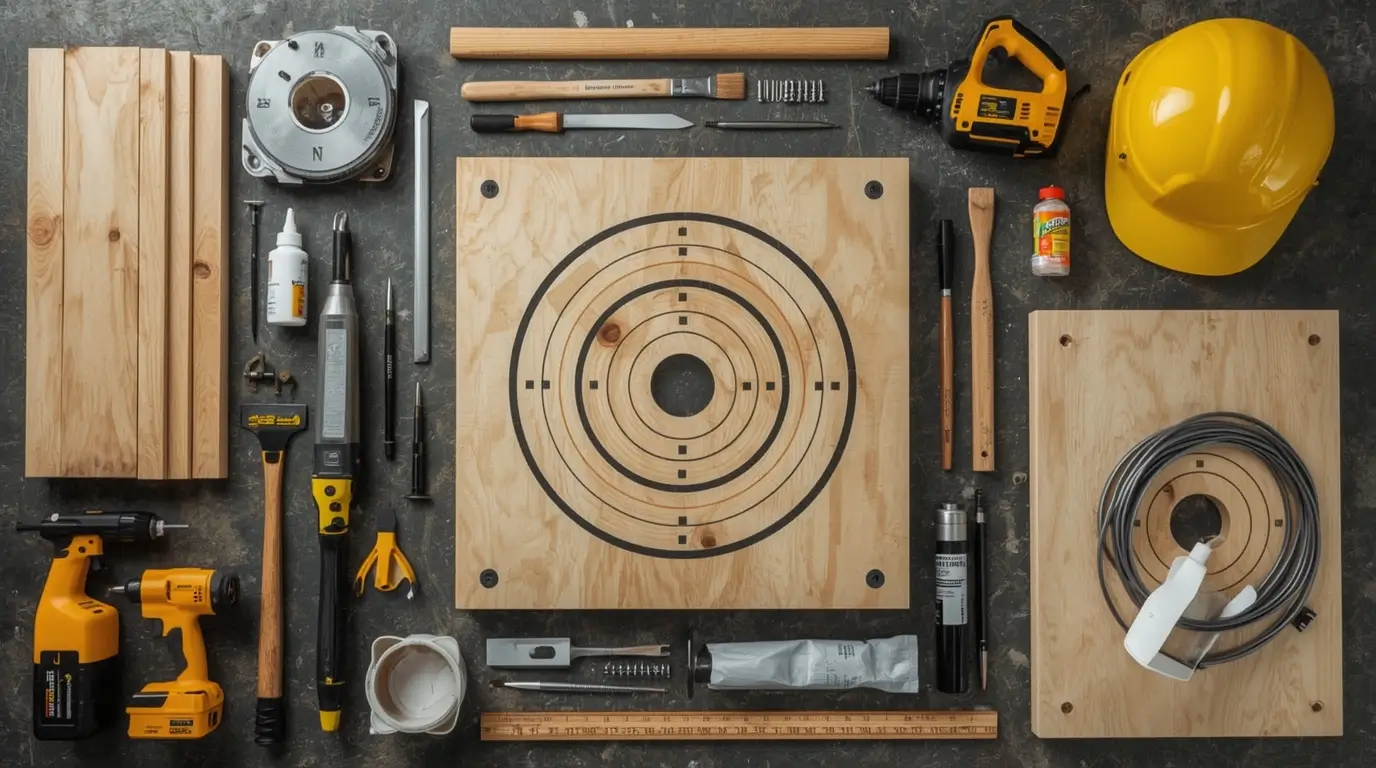
Materials and tools: the basis of your project
Target material launched: optimum selection
The choice of target material to throw determines the longevity and performance of your creation.
Solid wood - Premium solution :
Recommended specieses: poplar, lime, elm (soft fibres)
Dimensions 60 x 60 x 15 cm minimum
Density 400-600 kg/m³ (optimum absorption)
Cost 80-150 depending on fuel type
Service life 2-5 years intensive use
Multi-layer plywood - Economical solution :
Type 18-24 mm okoumé plywood
Configuration 3-4 glued layers
Benefits resistance to delamination, attractive price.
Cost 40-80 € full
Service life 1-3 years depending on use
Reclaimed wood - Ecological solution :
Sources Europe pallets (EUR marking), building sites
Board cutting : exact dimensions to the millimetre
Surface sanding 120 and 240 grit.
Checking squareness 90° perfect angles
Assembly marking precise benchmarks
Preparation of fixings: pre-drilled to avoid splitting.
Step 2. Structural assembly (3 h) :
Bonding the first layer : generous wood glue
Pressing 24 h: greenhouses or distributed weights
Intermediate layer assembly : joint offset
Fastening screws : stainless steel screws
Strength check assembly check
Step 3. Finishing and protection (4 h) :
Final sanding 320 grain, perfect finish.
Dust removal Vacuum + damp cloth
Application primer adhesion undercoat
Intermediate drying 4-6 h depending on conditions
Paint finish 2 cross-coats.
Stage 4 - Branding and design (2 h) :
Drawing circles compass + precision ruler.
Zone masking : demarcation adhesive
Paint colours : meticulous application.
Complete drying 24 h minimum
Masking removal manual finishing
Design targets axes: creativity and functionality
Le design target axes combines aesthetics and performance to boost your motivation to train.
Tried and tested classic designs :
Traditional style :
Concentric circles 3-5 scoring zones
Contrasting colours alternating red/white
Legible figures font bold 8 cm high.
Marked centre precise visual point
Modern minimalist style:
Geometric zones squares, triangles, hexagons
Monochrome palette black/white/grey
Contemporary typography sans-serif fonts
LED lighting illuminated contours
Customised theme style :
Celtic/vikings historical connection
Personal logos A unique identity
Team colours Club/family spirit
Motivational messages : inspirational quotes
Advanced functional designs :
Scoring system :
Removable zones level adaptation
Variable difficulties natural progression
Special challenges integrated mini-games
Visual feedback : performance colours
Safety and installation: top priority
Target security launched: essential protocols
La target security launched cannot be compromised in a domestic installation.
Dimensioning safety zone :
Minimum distance 4-6 metres target-launcher
Secure width : 6 metres minimum
Rear protection 3 metres behind the target
Side clearance: 2 metres from each side
Clearance height 4 metres above the target
Mandatory recovery system :
Protective net mesh size 5 x 5 cm maximum
Support structure 3 m high steel posts
Ground anchoring Concrete foundations 50 cm deep
Optimum voltage Tensioned net without sagging.
Secure use protocols :
Pre-session check Target state + equipment
Free zone confirmed absence of people/animals
Protective equipment gloves + closed shoes
Recovery procedure safe approach to axes
Professional installation and assembly
Foundations and support :
Concrete base 80 x 80 x 30 cm, maximum stability
Support posts Ø60 mm galvanised steel tubes
Stainless steel fasteners corrosion resistance
Precise levelling perfectly vertical target
Modular hanging system :
Aluminium rail High-strength fasteners
Adjustable hooks adapting heights
Anti-theft system : security padlock
Quick disassembly winter storage
Weather protection :
Protective roof transparent polycarbonate
Drainage rainwater drainage
Ventilation : natural wood drying
Protective tarpaulin : prolonged storage
Customisation and optimisation
Advanced creative customisation
Professional decorating techniques :
Artistic pyrography :
Engraved motifs : durability + uniqueness
Specialised tools pyrography 30-100 W
Complex designs portraits, detailed logos
Protective finish specialised varnish.
Integrated LED lighting :
LED strips contours zones scoring
Programmable colours : feedback performance
Solar power supply energy autonomy
Smartphone control dedicated app
Electronic sensors :
Impact detection automatic scoring
Digital display Real-time screen
Statistics performance analysis
Connectivity : share social networks
Optimising performance according to level
Beginner configuration :
Wide areas 15-25-35 cm in diameter
Bright colours maximum visibility
Generous points : motivation learning
Soft surface : easy axe recovery
Intermediate configuration :
Standard zones 10-20-30 cm in diameter
Traditional scoring 1-3-5-10 points
Balanced material challenge/sustainability
Modular options possible developments
Expert configuration :
Precision zones: 5 - 15 - 25 cm of diameters
Special challenges moving targets, complex shapes
Hard material technical challenge
Advanced system electronics + statistics
To perfect your technique, take part in the following events team building</a> organised by professionals.
Target axe maintenance: maximum durability
Systematic preventive maintenance
L'targeted axe maintenance determines its longevity and maintains optimum performance.
Weekly inspection :
Surface impact cracks, chips, deformation
Fasteners clamping, corrosion, wear
Support structure stability, alignment
Security zone obstacles, damage
Monthly maintenance :
Deep cleaning wire brush + vacuum
Screw tightening appropriate torque
Touching up paintwork : scaled areas
Lubrication Moving parts if applicable
Half-yearly review :
Partial dismantling internal inspection
Wood treatment protection glaze
Checking foundations level, cracks
Updating equipment : new technologies
Repairs and modifications
Routine repairs :
Filling impacts :
Wood pulp fibre reconstitution
Sanding, adjustment uniform surface.
Repainting invisible connections
Enhanced protection : vulnerable areas
Replacing sections :
Cutting worn areas millimetre precision
Grafting new wood solid assembly
Aesthetic integration : harmonisation
Resistance test repair validation
Progressive modernisation :
Adding technologies sensors, lighting
Design improvements aesthetic evolution
Performance optimisation innovative materials
Functionality extension new challenges
DIY technologies and innovations
Intelligent systems integration
Automatic scoring :
Piezoelectric sensors impact detection
Arduino microcontroller Signal processing
LED display Real-time score
Mobile application detailed statistics
Interactive target :
Projection screen Virtual targets
Camera tracking trajectory tracking
Augmented reality immersive challenges
Social sharing virtual community
A study by DIY Sportif research centre shows that these innovations increase the training motivation of 340 %.
Accessible innovative materials
Ecological bio-materials :
Hemp fibres resistance + durability
Expanded cork Optimum damping
Laminated bamboo exceptional rigidity
Mycelium self-healing living material
DIY composites :
In-house fibreglass impact resistance
Biobased epoxy resin Improved ecology
Textile reinforcement Technical fabrics
Hybrid assemblies Targeted performance
Detailed costs and budgets
Cost-benefit analysis by configuration
Budget beginner (€50-80) :
Standard plywood + basic paint
Borrowed/rented tools
Simple painted design
Temporary installation
Optimised intermediate budget (€120-200) :
Quality solid wood + meticulous finish
Basic personal tools
Customised design + protection
Semi-permanent installation
Premium expert budget (€300-500) :
Premium materials + technologies
Professional tools
Artistic design + innovation
Secure permanent installation
Comparison vs. commercial purchase :
Equivalent pro target : 400-800 €
Savings 40-70 % depending on configuration
Added value : personalisation + satisfaction
Amortization 6-18 months depending on use
Advanced projects and extensions
Multiple targets and increasing complexity
Automated rotary system :
Electric motor programmable rotation
Variable speeds : difficulties adapted
Remote control remote control
Enhanced security emergency stop
Multi-station course :
5 different targets : various distances/heights
Timed circuit Time challenges
Cumulative scoring measured growth
Narrative theme Immersive fun
Modular portable version :
Quick assembly 15 minutes editing time.
Easy transport dedicated case
Adapting to the terrain variable stability
Versatility of use indoor/outdoor
Community and sharing
Project documentation :
Photos stages visual tutorial
Detailed plans community sharing
Feedback continuous improvement
Creative developments mutual inspiration
To share your creations and challenge other enthusiasts, organise events festive</a> around your unique creation.
expert advice and feedback
Common mistakes to avoid
Design errors :
Undersizing target too small/fine
Bad material : wood too hard/soft.
Inadequate fixings fragile assembly
Neglected safety insufficient area
Manufacturing errors :
Precipitation drying deformation/cracks
Insufficient sanding poor finish
Forgotten protection rapid deterioration
Approximate measurements Assembly failure
Pro optimisations revealed
Trade secrets :
Wood moisture : 12-15 % optimal before assembly
Fibre direction perpendicular orientation of layers
Assembly temperature 18-22 °C ideal
Stainless steel screws A4 marine for longevity
Finishing techniques :
Impression coats spray uniformity.
Precision masking : quality painter's adhesive
Controlled drying : draught-free ventilation
UV protection anti-discolouration varnish
Conclusion: your project, your pride
Making a target for throwing axes at home transcends simple DIY to become a unique personal creation. This target to launch DIY reflects your personality, your requirements and your passion for this fascinating discipline.
Your construction target axes project combines substantial savings, creative satisfaction and tailor-made performance. L'targeted axe maintenance guarantees years of pleasure and optimal training.
Each impact on your creation reinforces the unique link between craftsman and equipment. Your launched target material carefully selected and your design target axes The personal touch makes each session a special experience.
Ready to create your own masterpiece and join the community of passionate launchers?